Humboldt County, CA – More Than Just Weed (but also weed)

Do you want to be part of our private, professional community?
Join Now

In this article, Growers Network discusses the little slice of Cannabis heaven called Humboldt County, California.

GN Logo

Humboldt County, it needs no introduction (but we’re going to do it anyway). The unofficial Cannabis capital of California, there’s not a Cannabis enthusiast alive who hasn’t heard of it. Comprised of 4,052 square-miles of mostly rural landscapes including mountains, redwood forests, and of course a beautiful 100+ miles of coastline, it’s a bucolic paradise. But while its reputation precedes it, it’s not all about the weed, man.


A Little Humboldt History


Originally inhabited by a variety of native tribes, the area that was to become Humboldt County was first visited by Europeans in 1775 when the Spanish landed on what would become the coastal town of Trinidad. It wasn’t until 1850 however, that Douglas Ottinger and Hans Buhne christened the port of Humboldt Bay, naming it after Alexander von Humboldt, the explorer and naturalist. Humboldt county was incorporated in 1853.

Modern Humboldt County and its Cannabis association was a result of a “hippie migration” during the 1960s. Drawn in by cheap property and a desire to live off the land, the counterculture settled into an agrarian life, growing Cannabis alongside their food crops. While they didn’t originally intend to grow Cannabis commercially, President Nixon’s “War on Drugs” ramped up demand for cannabis, and Humboldt pot farmers began to fill that demand. US trade embargoes against Mexico and the active destruction of Mexico’s Cannabis farms by the US government depleted the supply of cannabis nationwide. Though Colombia was quick to pick up the slack in supply, Humboldt County became the hotbed of Cannabis cultivation in California, and a new economy was born.

humboldt seal


The Emerald Triangle


While Humboldt County gets the bulk of the recognition, it’s part of a larger tri-county Cannabis culture made up of Mendocino, Trinity, and Humboldt counties. Dubbed the “Emerald Triangle,” the region at one time produced over 70% of non-imported Cannabis consumed in the US.

But as we said, it’s not all about weed. Humboldt County is full of fun for outdoor types, artisans, and history buffs.


Visiting Humboldt County


Even if you’re visiting the region to sample some Cannabis culture, chances are you’re going to want to do more than toke up in your Airbnb. Whatever your interests, you’re sure to find some Cannabis and non-Cannabis things to do and see.

Cannabis Attractions

We wouldn’t be Growers Network without talking about Cannabis. For the enthusiast or the cannacurious, there are a multitude of weed-themed activities: farm and dispensary tours, cooking with Cannabis classes, Cannabis Spa treatments, and more. Humboldt Cannabis Tours will even pick you up anywhere in the world in a private jet and drop you into the heart of the Emerald Triangle for a customized visit.

Other Attractions

Humboldt County has some of the most beautiful natural spots in the world. The region is home to 40% of the country’s old growth redwood forests. Parks in the area include:

  1. Redwood National Park
  2. Six Rivers National Forest
  3. Shasta-Trinity National Forest

And if the forest isn’t your thing, you can go whale watching by boat or from the cliffs of the pristine northern California coast. Additionally, there are kayak tours, harbor boat rides, and even an oyster tour. Not the outdoor type? You can also check out the Loleta Cheese Factory tour or take a haunted history tour in Eureka, the county seat of Humboldt.

redwoods
Sunlight through the redwoods. Gorgeous!


So as you can see, Humboldt County has a rich history and a lot to offer whether you're interested in Cannabis, beautiful natural sites, or even cheese. But wait! I almost forgot the best part of Humboldt! Did you know that Canna Cribs episode 5 features Humboldt’s own Honeydew Farms? You do now. Look for it next week, but until then, check out the trailer!


Did you like this article? Is there something about Humboldt we should have mentioned and didn’t? Let us know by leaving a comment in the survey below, or better yet, join our forum and start a conversation!


Enjoyed the article? Want to continue the conversation?
Join Now


Do you want to receive the next Grower's Spotlight as soon as it's available? Sign up below!


Do you have any questions or comments?

Feel free to post below!


About the Author

Chris DeWildt is a graduate of Grand Valley State University and Western Kentucky University. He worked in education and publishing for ten years before joining the team at Growers Network.
Beneficial Organism Profile: Nematodes

Do you want to be part of our private, professional community?
Join Now

In this series of articles, Growers Network discusses a few beneficial organisms you can use to benefit your Cannabis grow. Today’s Topic: Nematodes.

GN logo

Hello growers! Hopefully your crop is healthy and green. Question: Are you using any beneficials as part of your pest control program? Did you know that you can use beneficial nematodes to help protect your plants from the things out there that would like to hurt it? True story! Read on for all the news on nematodes!

Writer’s Note: There are many different species of nematode, some are harmful and some are helpful. So if you hear about someone's crop being destroyed by nematodes, those aren’t the species we’re discussing today!


Quick Look

Scientific Name: Various species in the Phylum Nematoda
Including:

  1. Heterorhabditis bacteriophora
    1. Steinernema carpocapsae
    2. Steinernema Feltiae

    Common Name: Roundworms
    How They Help: Paracistize pest species associated with Cannabis


    “A nema-what?”


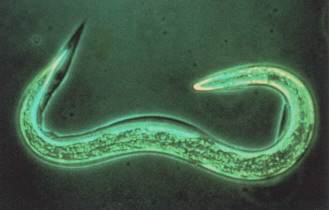
    Nematodes are tiny invertebrates commonly referred to as roundworms. Nematodes are often predatory and nearly half are considered parasitic. Some are microscopic while other free-living nematodes can be much larger. When using them for pest control, different species will parasitize different arthropod pests both above and below the soil.

    nematode
    Beneficial nematode under the microscope


    How Nematodes Help


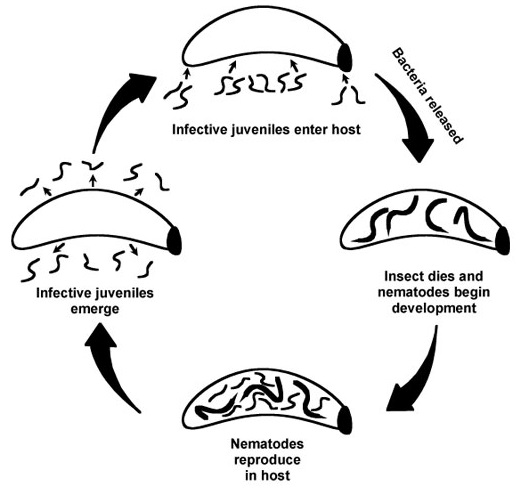
    Nematodes are hunters, and different species employ different hunting strategies. Some, like Heterorhabditis bacteriophora work beneath the soil, while the species Steinernema carpocapsae waits for a pest to walk by and attaches itself to the unsuspecting host. Both of these strategies allow the juvenile nematode to enter and kill the pest via a toxic bacterium, and then use the resulting corpse as part of its reproductive cycle, reproducing inside and sending their juveniles out into the environment to find their next host.

    nema lifecycle

    An important thing to consider if you’re planning on using beneficial nematodes is that you have to keep your soil “clean.” Often, recycled soil contains other microbial pests that can kill off your beneficials, particularly certain species of fungi and bacteria. For this reason it’s important to use the cleanest substrate you can find and consider treating with a fungicide/bactericide combo in addition to using beneficials.

    Editor’s Note: You can also treat “dirty” media with other beneficials. A variety of soil inoculants are commercially available.


    So there it is, beneficial nematode basics. While there are many pest control options available, the upside of beneficials such as the nematode is that they add a layer of organic defense when pesticides just won’t cut it due to safety and regulations, and this is especially important with a medicinal plant like Cannabis. Read on and check the list below to see what species of nematode we mentioned is best for each pest.

    Happy growing!


    Targeting Pests with Nematodes

    Heterorhabditis bacteriophora can help prevent:

    1. Ticks
    2. Ant Queens
    3. Adult Fleas
    4. Humpback Flies
    5. Leafminers
    6. Gall Midges
    7. Moths
    8. Some Species of Weevils

    Steinernema carpocapsae can help prevent:

    1. Black Cutworms
    2. Caterpillars
    3. Flea Larvae
    4. Fly Larvae
    5. Webworms
    6. Wireworms
    7. Wood Borers
    8. Some Species of Weevils

    Steinernema Feltiae can help prevent:

    1. Black Cutworms
    2. Fungus Gnats
    3. Pill Worm
    4. Root Maggots
    5. Shore Flies
    6. Ticks
    7. Some Species of Weevils

Enjoyed the article? Want to continue the conversation?
Join Now


Do you want to receive the next Grower's Spotlight as soon as it's available? Sign up below!


Do you have any questions or comments?

Feel free to post below!


About the Author

Chris DeWildt is a graduate of Grand Valley State University and Western Kentucky University. He worked in education and publishing for ten years before joining the team at Growers Network.

Growers Network’s Conditions Profile: Light Burn

Do you want to be part of our private, professional community?
Join Now

In this article, Growers Network discusses the whys and hows of light burn, an often misdiagnosed condition you may find yourself dealing with in your Cannabis grow.

GN logo

You’ve taken all the precautions against disease, you’ve checked on your nutrient levels, your crop is pest free, but you’ve still got yellowing leaves. What’s going on? Well friend, have you considered light burn? If you haven’t, you’re not alone. It’s often misdiagnosed, but if you know what to look for, you can stop it.


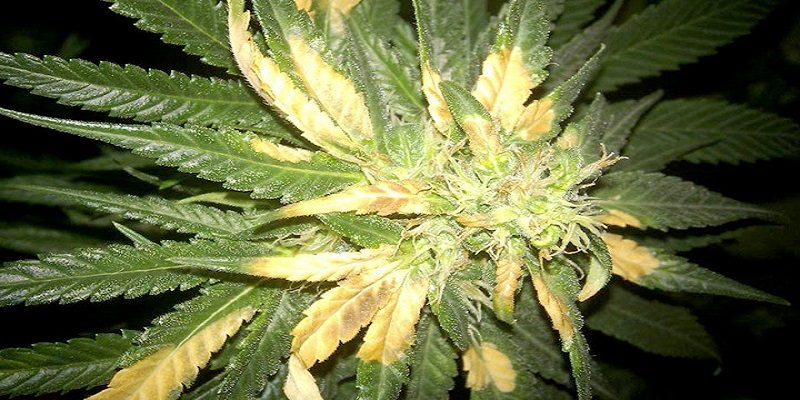
light burn
This is what light burn looks like

Quick Look

Condition: Light Burn
Technical Name: Photobleaching and/or Photoinhibition
Symptoms: Yellow/white bleached leaves and buds
Cause: Light source is too intense/close to your plants
Remedy: Reduce the intensity/proximity of your grow lights


We should have issued a content warning because that photo are pretty hard to look at. Worse than pictures though is seeing your own plants looking unhealthy, so hopefully the info we provide today will help you prevent light burn or at least help you recognize it when it occurs.

As stated above, the cause of light burn is pretty simple, the lights in your grow are too close to your plants, or they’re too intense. Obviously, if your plants have grown so tall they’re in physical contact with the lights, this phenomenon is pretty self explanatory, but the leaves don’t actually have to come into contact with the light for this type of burn to occur, which can leave a grower scratching their head. Add to the fact that this condition is often mistaken for nitrogen deficiency or disease, and who would blame them for not knowing? There is hope however, and there are a few key characteristics that can help you diagnose light burn accurately.

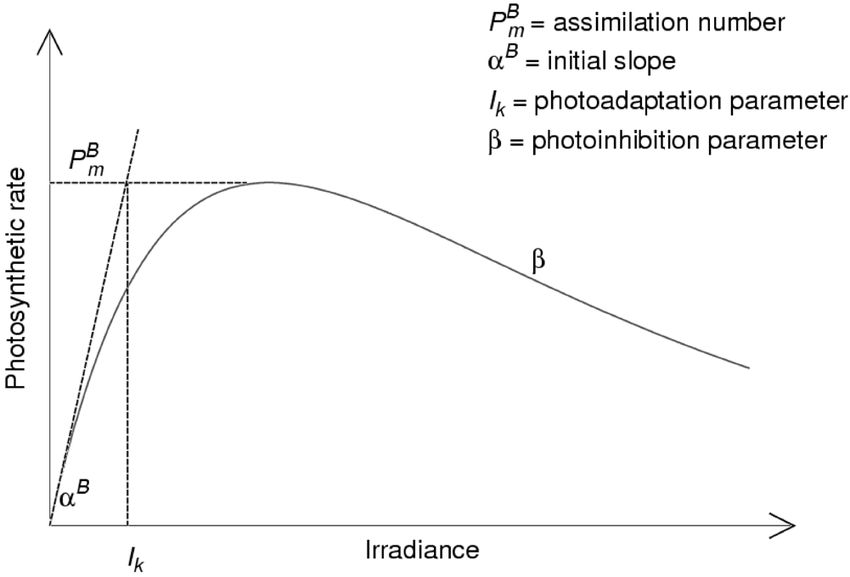
PI curve
This graph shows how the photosynthetic rate decreases if light becomes too intense

Leaves Begin Pointing Up

Even before the leaves begin to yellow as a result of light burn, you may notice that the leaves begin to curl up. Leaves that point up can be an early indication of light burn. Being aware of this sign can help you address a "light burn problem" before it becomes a "light burn crisis."

Editor’s Note: This is sometime colloquially referred to as “taco-ing,” where the leaves start to resemble a taco shell.

The Light-bleached Leaves Don’t Fall Off Easily

With many nutrient problems and diseases that affect Cannabis leaves, growers find that the yellow leaves fall off on their own or with only a small amount of effort. This is not the case with light burn. Leaves affected by light burn won’t fall off readily and are more difficult to pluck off than nutrient deficient or diseased leaves, an important distinction when trying to diagnose.

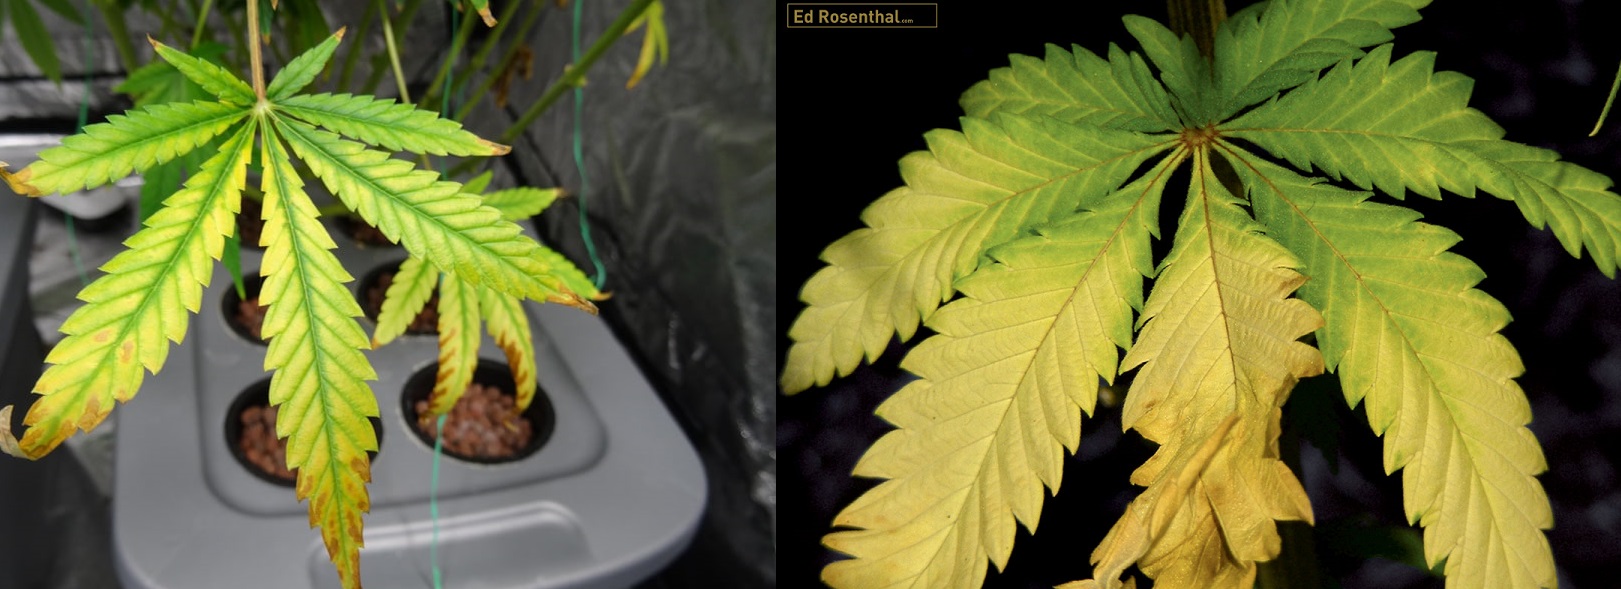
comparison
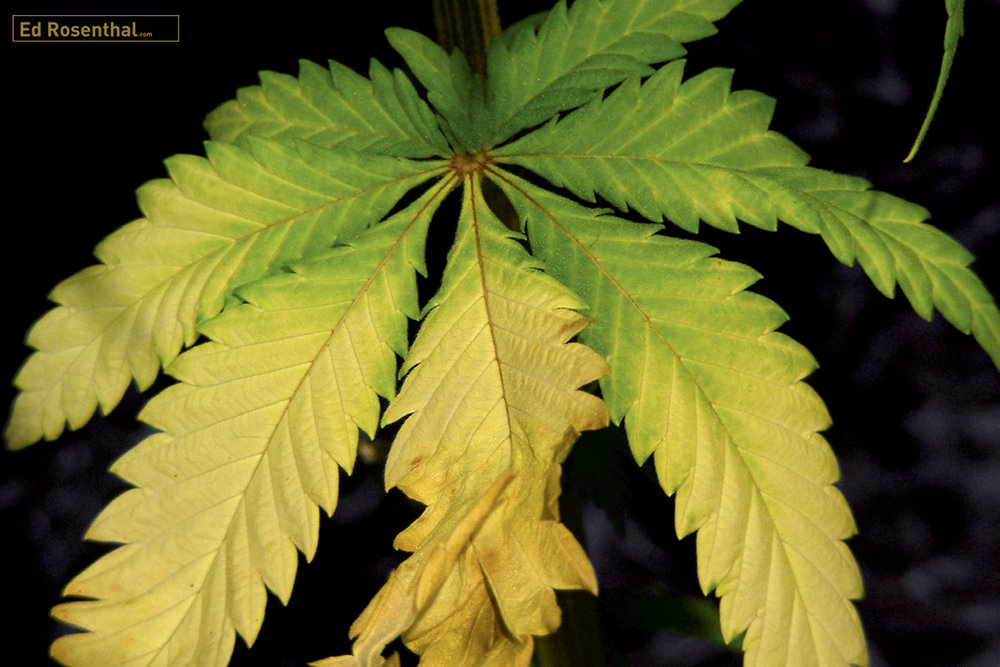
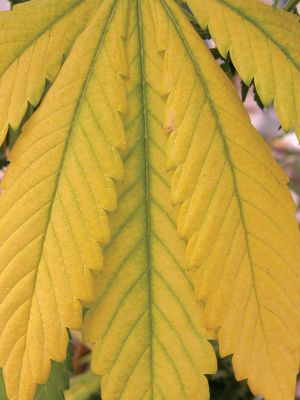
Note the green veins and curling leaf tips of light burn (left) compared to the full yellowing and wilting of nitrogen deficiency (right).
(Images courtesy of growweedeasy.com and edrosenthal.com)

Location Location Location!

Another distinction between light burn and other leaf problems is the location on the plant. Nutrient problems typically begin in the soil, so what you’ll find is the the problem begins at the lower level leaves. Light burn on the other hand will start at the top layer, those leaves closest to the light.


Treating for Light Burn

The first thing you need to do is move your lights farther away from your plants, or even reduce the number of lights. If you can’t do this, consider gently bending your plants or, though more extreme, consider cutting the top of the plant to reduce the height. This type of cutting shouldn’t be done if your plants have entered flowering however as you’ll lose part of your harvest.

Additional tips:

  1. Nutrient deficiencies can make light burn worse, so if you’ve diagnosed a case of light burn, be sure to check on your nutrient levels as well.
  2. The veins of the leaves will typically remain green when experiencing light burn, unlike the complete yellowing caused by other issues.
  3. Heat stress is another condition that presents in the same way as light burn, so make sure your grow is kept at an acceptable temperature.
  4. While light burn in outdoor grows is unlikely, moving a plant from an indoor to an intensely lit outdoor environment can cause it to occur. Consider transitioning your plants gradually by moving them to a partially shaded area for a few days before exposing them to full sun.


So, do you feel “enlightened?” We hope so! Did we miss something, or is there a Cannabis condition we haven’t covered that you think we should? Drop a comment in the survey below, or better yet, start a discussion in our forum. Happy Growing!


Enjoyed the article? Want to continue the conversation?
Join Now

Do you want to receive the next Grower's Spotlight as soon as it's available? Sign up below!


Do you have any questions or comments?

Feel free to post below!


About the Author

Chris DeWildt is a graduate of Grand Valley State University and Western Kentucky University. He worked in education and publishing for ten years before joining the team at Growers Network.

Growers Network’s Condition Profile: Nitrogen Deficiency

Do you want to be part of our private, professional community?
Join Now

In this series of articles, Growers Network talks about a few of the most common Cannabis conditions you need to watch out for. Today’s topic: Nitrogen Deficiency.

The following is an article produced by a contributing author. Growers Network does not endorse nor evaluate the claims of our contributors, nor do they influence our editorial process. We thank our contributors for their time and effort so we can continue our exclusive Growers Spotlight service.

Plant conditions can be a major headache in any grow operation and Cannabis has no shortage of them. So for today’s condition profile we’re going to discuss nitrogen deficiency, a condition you may find yourself dealing with in your grow if your nutrients aren’t adjusted properly.


Quick Look

  1. Common Name: Nitrogen Deficiency
  2. Scientific Name: Nitrogen Deficiency
  3. Symptoms: Chlorosis, leaf yellowing, stunted growth, dormant flowers
  4. Caused by: Excessive carbon, pH imbalance, insufficient nitrogen
  5. Timing: Any time


Nitrogen Deficiency


What is it?

Nitrogen deficiency is exactly as it describes -- a lack of enough nitrogen in the soil or medium to provide enough nutrients for the plant to properly grow.

Image courtesy of EdRosenthal.com

What to look for

Nitrogen deficiency should be relatively simple to spot, but it can be confused for other nutrient deficiencies, or caused by problems other than sufficient nitrogen. Because nitrogen is a “mobile” nutrient, meaning that it can move out of older leaves into younger leaves, older leaves will display signs of a deficiency first.

Symptoms can include:

  1. ”Faded” or light green leaves.
  2. Older leaves yellowing, browning, or dying.
  3. Stunted growth
  4. Bud underdevelopment


How to Treat/Prevent

Identification

First, you need to make sure that you actually have a nitrogen deficiency before you start supplementing with additional nutrients. If you add too many nutrients, you could be aggravating a different problem with your plants!

To identify you have the “right” deficiency, check the pH and EC of your nutrient water in the line, and test the pH and EC of the runoff. If you see a drop in EC and pH remains constant, then your pH values are correct and you can check for other issues. If your EC doesn’t drop (or drops too much), or your pH varies, then you may have another issue. Check this article out for more details about runoff issues.

However, runoff tests aren’t always the most reliable. They are cheap and fast, but not a guarantee by any stretch. They also don’t tell you precisely what you’re missing. If you truly want to know what’s going on, you need to send in a tissue sample or soil sample to a lab and get their analysis.

Treatment

Treatment will depend on the aforementioned identification. If you find that your pH is outside of acceptable ranges (5.5-6.5), first correct your pH. If your EC is reading odd or abnormal values, then make sure there isn’t a salt buildup or precipitate in your feeding regimen.

If test results show a deficiency in calcium or magnesium, add a CalMag to your feeding regimen and see if the problem resolves.

And if you get test results back for low nitrogen, the solution is simple! Add more nitrogen!

Prevention

Prevention will be multifold. First, you need to monitor your soil/medium and feed water to make sure that you don’t have precipitate and your pH is in an appropriate range (5.5 to 6.5, slightly acidic). From there, if you are using an RO water system, make sure to add an appropriate CalMag supplement to your normal feeding regimen.

Finally, take regular soil or tissue samples into a lab for analysis. You should be able to spot potential issues in advance with your test results.


A Few Other Things

Nitrogen deficiencies may not actually be caused by a lack of nitrogen in your soil or medium! Several micronutrients play a role in how well your plants can absorb nitrogen. Other nutrients that can impact nitrogen availability for your plants include:

  1. Calcium deficiency
  2. Magnesium deficiency
  3. Excessive carbon (uncommon, but possible)

Additionally, a nitrogen deficiency during late flowering might not be cause for alarm, according to several sources, because the plant is pushing its last resources into flowers. If nitrogen deficiencies are showing at any other stage though, you may be having some problems.


So now you know a bit about nitrogen deficiency and what you can do to prevent it from ruining your grow. Have additional questions about nitrogen deficiency? You should join our forum where you can post pics and ask our expert community about this topic or any other!

Happy Growing!


Enjoyed the article? Want to continue the conversation?
Join Now

Do you want to receive the next Grower's Spotlight as soon as it's available? Sign up below!


Resources:

  1. Want to learn more about subjects similar to those touched upon in this article? Check out our articles on subjects such as:
    1. Testing Your Runoff
    2. The Causes of Yellowing
    3. Exploring the Effects of Light Radiation on Human Health
    4. Growers Network’s Pest Profile: Leaf Miners
    5. Growers Network’s Disease Profile: Powdery Mildew

Do you have any questions or comments?

Feel free to post below!


About the Author

Hunter Wilson is a community builder with Growers Network. He graduated from the University of Arizona in 2011 with a Masters in Teaching and in 2007 with a Bachelors in Biology.


Growers Network’s Disease Profile: Pseudomonas cannabina, a Bacterial Cause of Blight

Do you want to be part of our private, professional community?
Join Now

In this series of articles, Growers Network talks about a few of the most common Cannabis diseases you need to watch out for. Today’s topic: the bacterium Pseudomonas cannabina, a cause of blight.

GN logo

Plant diseases can be a nightmare in any grow operation and Cannabis has no shortage of diseases that would love to ruin your crop. So for today’s profile we’re going to discussPseudomonas cannabina a bacterial blight pathogen you may find yourself dealing with in your grow.


Quick Look

  1. Common Name: Bacterial Blight
  2. Scientific Name: Species of the Pseudomonas genus, including Pseudomonas cannabina
  3. Symptoms: Yellowing leaves, water-soaked lesions, necrosis of lesions
  4. Caused by: Bacteria
  5. Timing: Anytime conditions are cool and wet


Pseudomonas cannabina

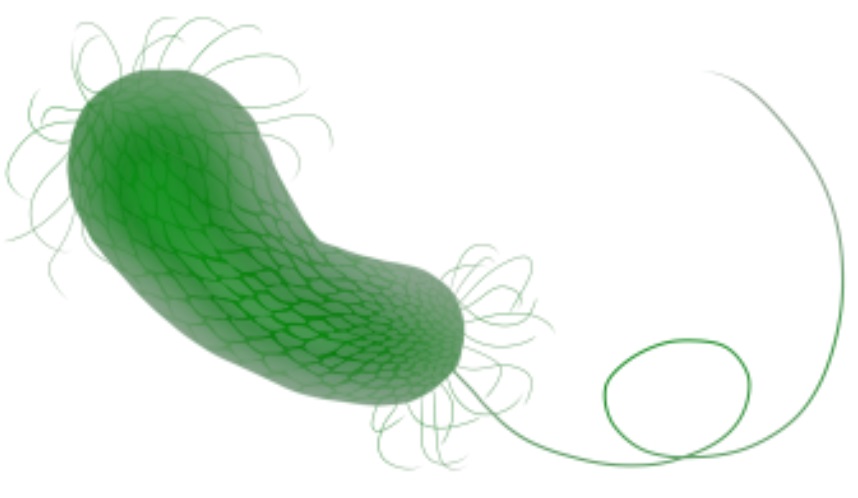
P cannabina
This is Pseudomonas cannabina, a cause of blight.


What is Pseudomonas cannabina?

Pseudomonas cannabina is a flagellated bacteria that causes blight on leaves. The symptoms can often be mistaken for Brown Leaf Spot, Septoria, a nutrient deficiency, or symptoms due to overwatering. It is spread most often by water through irrigation. It’s important to note that “blight” is a general term for the symptoms caused by several fungal or bacterial vectors.

What to look for

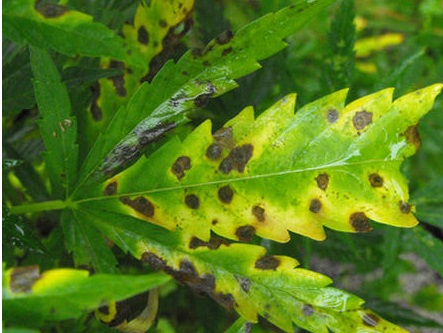
As previously mentioned, symptoms include leaf lesions as well as stem and leaf rot. Lesions show as tan or brown spots haloed in yellow.

blight
This is what blight looks like on Cannabis (photo courtesy of nexles.com)


How to Treat/PreventPseudomonas cannabina

Treatment

An issue in treating blight is that it isn’t immediately apparent whether the symptoms are the result of a bacterium such as P. cannabina or a fungus. Fortunately there are many commercial bactericide/fungicide combos available to treat blight.

Writer’s Note: Always be aware of the laws and safe practices regarding pesticide use in your jurisdiction, and only use products according to the manufacturer’s instructions.

Prevention

Prevention of Bacterial Blight begins with the environment. Make sure you aren’t overwatering, as Pseudomonas cannabina thrives in wet conditions. Additionally, keep adequate space between plants to reduce likelihood of spread. There are also air sanitizers available that will kill microbial pathogens before they can start causing havoc for your operation.


So now you know a bit aboutPseudomonas cannabina and what you can do to prevent it from ruining your grow. Have additional questions about this bacterial disease vector? You should join our forum where you can post pics and ask our expert community about this topic or any other!

Happy Growing!


Enjoyed the article? Want to continue the conversation?
Join Now

Do you want to receive the next Grower's Spotlight as soon as it's available? Sign up below!


Do you have any questions or comments?

Feel free to post below!


About the Author

Chris DeWildt is a graduate of Grand Valley State University and Western Kentucky University. He worked in education and publishing for ten years before joining the team at Growers Network.


Growers Network’s Condition Profile: Nutrient Burn

Do you want to be part of our private, professional community?
Join Now

In this series of articles, Growers Network talks about a few of the most common Cannabis conditions you need to watch out for. Today’s topic: Nutrient Burn.

The following is an article produced by a contributing author. Growers Network does not endorse nor evaluate the claims of our contributors, nor do they influence our editorial process. We thank our contributors for their time and effort so we can continue our exclusive Growers Spotlight service.


Plant conditions can be a major headache in any grow operation and Cannabis has no shortage of them. So for today’s condition profile we’re going to discuss nutrient burn, a condition you may find yourself dealing with in your grow if your nutrients aren’t adjusted properly.


Quick Look

  1. Common Name: Nutrient Burn
  2. Scientific Name: Nutrient Toxicity
  3. Symptoms: Leaves with “burn” marks on them, despite no fire.
  4. Caused by: Excessive nutrients
  5. Timing: Any time


Nutrient Burn


What is it?

Nutrient toxicity is the result of an excess of nutrients in your soil or medium. There could be an overabundance of either your macronutrients or micronutrients.

What to look for

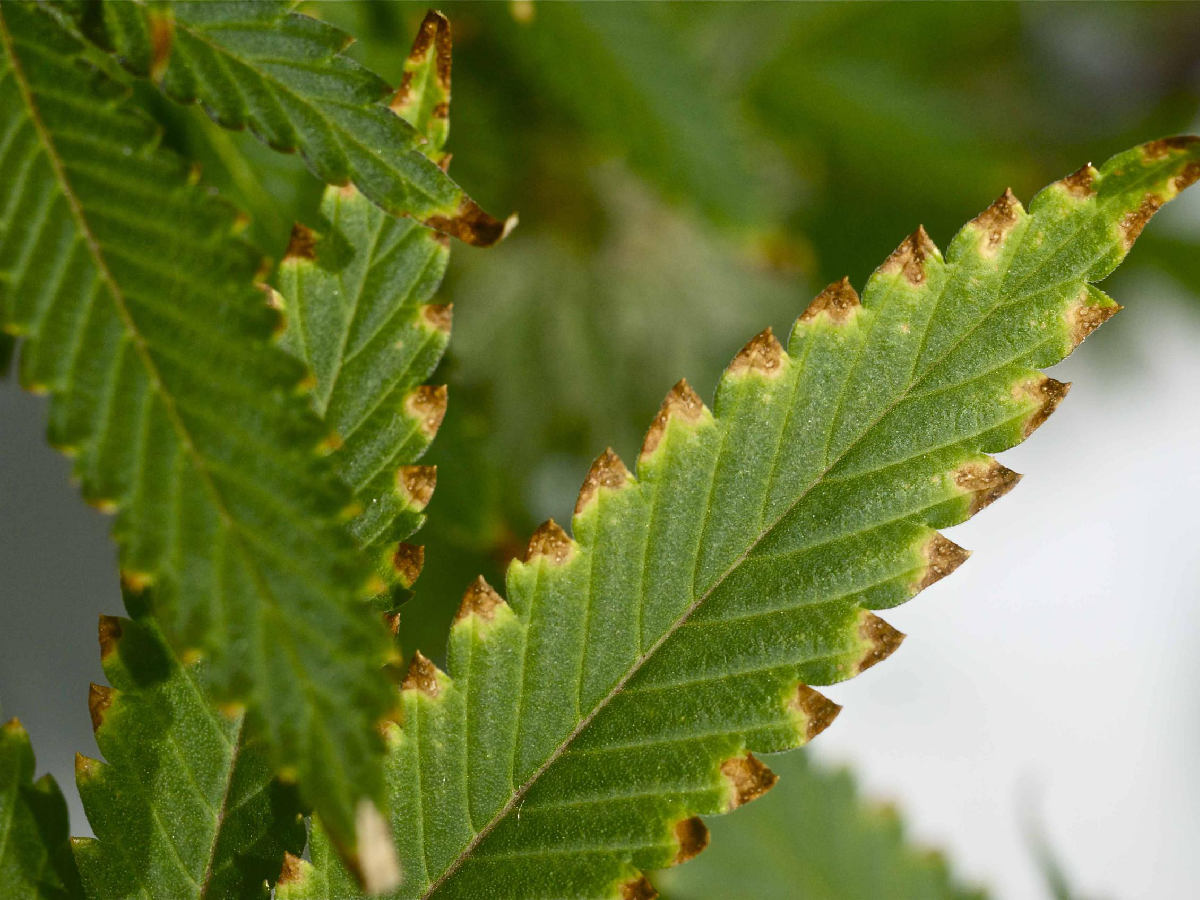
Nutrient toxicity can present in many different ways, depending on which nutrient is in excess. The most common appearance, and thus the common name of nutrient “burn,” is because leaf tips will start to appear like they’ve been singed, with orange, brown, or black tips.

However, burned tips are not the only symptom of nutrient toxicity. Other symptoms can include:

  1. Unusually dark green leaves
  2. Leaf death
  3. Damaged or underdeveloped roots
  4. Malformed flowers
  5. Brown spots
  6. Chlorosis/blotchy leaves
  7. Necrosis


How to Treat/Prevent

Hydroponic Systems

In hydroponic grows, you will want to check your pH first to make sure that it’s not out of normal range (5.5 to 6.5 pH, or slightly acidic). Many nutrient issues are caused by pH being out of alignment.

Assuming your pH is fine, flush your nutrients out of your system and start with a fresh set of balanced nutrients. In theory you could also dilute the nutrients by adding more water, but then you could theoretically run into deficiencies in other nutrients.

Finally, make sure to check that your feed schedule is in line with what your plants need. Depending on their strain and what part of their growth they are in, they made need different nutrients. Make sure that your feed schedule aligns with the plant’s needs.

Soil

In soil, remediating toxicity is little bit more difficult. You will need to add more water and fewer nutrients to dilute the excess nutrition. Monitor carefully for signs of any nutrient deficiency during this process, and correct should any signs of deficiency appear. Once new leaves appear to be returning to a healthy state, stop diluting and return to a balanced feeding schedule.

To prevent this from happening, make sure you aren’t fertilizing your soil when you don’t need to. It’s better to under-fertilize in soil than it is to over-fertilize. You can always add fertilizer to soil -- it’s much harder to take it away.

However, it’s not the end of the world for soil -- beneficial microbes can help regulate nutrient toxicities and deficiencies. Consider incoulating your soil with beneficial microbes to help reduce risks.


One Other Thing

Nutrient toxicity can cascade into other problems. Excessive nutrients could disrupt the natural microbial makeup in your systems, so make sure to inoculate with beneficial microbes after correcting the nutrient excess. Additionally, make sure to keep a close eye out for pests during your adjustment period!


So now you know a bit about nutrient burn and what you can do to prevent it from ruining your grow. Have additional questions about nutrient burn? You should join our forum where you can post pics and ask our expert community about this topic or any other!

Happy Growing!


Enjoyed the article? Want to continue the conversation?
Join Now

Do you want to receive the next Grower's Spotlight as soon as it's available? Sign up below!


Resources:

  1. Want to learn more about subjects similar to those touched upon in this article? Check out our articles on subjects such as:
    1. From Flask to Field: How Microbes are Revolutionizing Big Agriculture
    2. Bacteria and Fungi – Friends of Cannabis
    3. Testing Your Runoff
    4. Bacteria and Fungi – Friends of Cannabis
    5. Cannabis is legal! (In Canada)

Do you have any questions or comments?

Feel free to post below!


About the Author

Hunter Wilson is a community builder with Growers Network. He graduated from the University of Arizona in 2011 with a Masters in Teaching and in 2007 with a Bachelors in Biology.


Growers Network’s Disease Profile: Verticillium Wilt

Do you want to be part of our private, professional community?
Join Now

In this series of articles, Growers Network talks about a few of the most common Cannabis diseases you need to watch out for. Today’s topic: Verticillium Wilt.

GN logo

Plant diseases can be a nightmare in any grow operation and Cannabis has no shortage of diseases that would love to ruin your crop. So for today’s profile we’re going to discuss Verticillium Wilt, yet another fungal disease you may find yourself dealing with in your grow.


Quick Look

  1. Common Name: Verticillium Wilt
  2. Scientific Name: Six species within the Verticillium genus:
    1. V. dahliae
    2. V. albo-atrum
    3. V. longisporum
    4. V. nubilum
    5. V. theobromae
    6. V. tricorpus
  3. Symptoms: Shriveled, yellow-brown leaves (begins at lower leaves), brown stem
  4. Caused by: Fungus
  5. Timing: Spring-Fall


Verticillium Wilt

V wilt
Verticillium Wilt on Cannabis (photo courtesy of ilovegrowingmarijuana.com)


What is Verticillium Wilt?

Verticillium Wilt is a condition caused by several fungi species of the Verticillium genus. Starting in the soil, the fungus infects the plant through the roots and moving upward through the water conducting tissues. The result is a wilting of the plant due to water stress.

What to look for

Symptoms of Verticillium Wilt to watch for include yellow and shriveling of leaves. You may also see a sudden wilting of the plant, particularly in hot weather. The plant may recover when cooler and wetter conditions prevail.

How to Treat/Prevent Verticillium Wilt

There are no chemical treatments available for Verticillium Wilt infected Cannabis, so prevention and mitigation are key. Here are some preventative tips:

  1. Wash tools and boots to prevent spreading the disease via contaminated soil.
  2. Control weeds as some species can host the fungus with no symptoms.
  3. Remove infected plants and destroy them.
  4. Heavy watering and fertilizers may stimulate new tissue growth, but this does not prevent potential reinfection.

Writer's note: In some cases it’s recommended that the infected soil be grassed over for a minimum of fifteen years (!) before replanting.


So now you know a bit about Verticillium Wilt and what you can do to prevent it from ruining your grow. Have additional questions about Verticillium Wilt? You should join our forum where you can post pics and ask our expert community about this topic or any other!

Happy Growing!


Enjoyed the article? Want to continue the conversation?
Join Now

Do you want to receive the next Grower's Spotlight as soon as it's available? Sign up below!


Do you have any questions or comments?

Feel free to post below!


About the Author

Chris DeWildt is a graduate of Grand Valley State University and Western Kentucky University. He worked in education and publishing for ten years before joining the team at Growers Network.

Growers Network’s Disease Profile: Septoria Leaf Spot

Do you want to be part of our private, professional community?
Join Now

In this series of articles, Growers Network talks about a few of the most common Cannabis diseases you need to watch out for. Today’s topic: Septoria leaf spot.

GN Logo

Plant diseases are a major headache in any grow operation and Cannabis has no shortage of diseases that would love to ruin your crop. So for today’s profile we’re going to discuss Septoria Leaf Spot, a disease you may find yourself dealing with in your grow.


Quick Look

  1. Common Name: Septoria Leaf Spot/Yellow Leaf Spot/Leaf Spot
  2. Scientific Name: Septoria cannabis
  3. Symptoms: White-yellow lesions on leaves, browning of leaves, chlorosis (whitening)
  4. Caused by: Fungus
  5. Timing: Summer-Fall (spores can survive in detritus year-round)


Septoria Leaf Spot

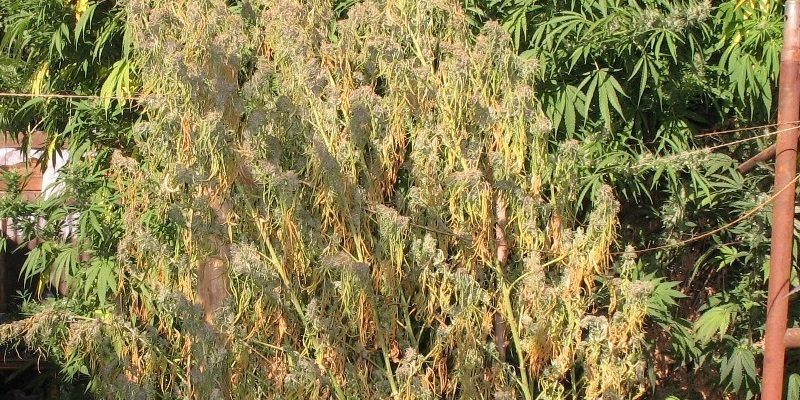
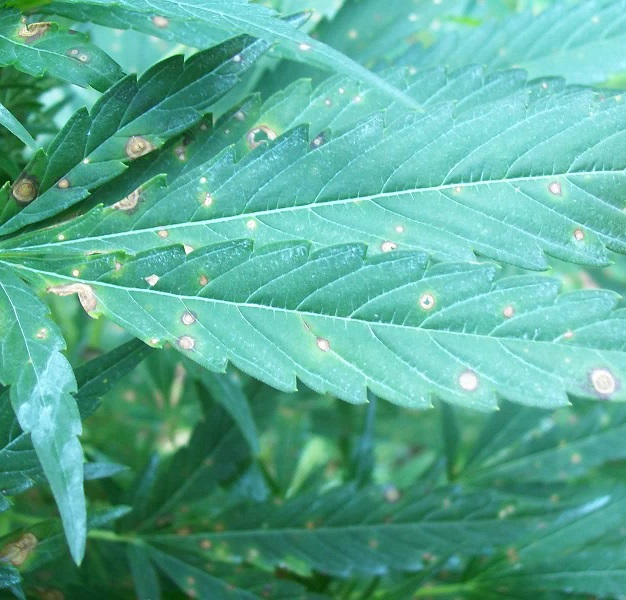
septoria
The fungus Septoria cannabis causes Septoria Leaf Spot. (photo courtesy of ilovegrowingmarijuana.com)


What is Septoria Leaf Spot ?

Septoria leaf spot, also called “Yellow Leaf Spot” or just “Leaf Spot” is a fungal disease with various species that infect a wide variety of plants. The Septoria cannabis species however is limited to infecting hemp and Cannabis only. As seen above, it is characterized by causing yellow-white circular spots to appear on the leaves. Left untreated it will spread to all vegetative growth, leaving the plant unable to complete biological processes. While not often fatal, this disease will result in slowed growth and low yields.

What to look for

As previously mentioned, Septoria symptoms include leaf spots, leaf death, and chlorosis (whitening of the plant). Conditions that invite this disease include wet leaves, dead plant material in the vicinity, and humidity.


How to Prevent/Treat Septoria Leaf Spot

Non-Chemical Control

To prevent Septoria Leaf Spot it’s important to control the environment of the grow. Here are a few prevention tips:

  1. Keep relative humidity low.
  2. Make sure to clean up and remove all dead plant material as these can host fungal spores and reinfect when the time is right (Summer-Fall).
  3. Avoid overhead watering if possible, especially in the evening as wet leaves can facilitate infection.
  4. Create additional space between plants to prevent transmission and an all-out infestation of the crop.
Chemical Treatment

There are a variety of commercial fungicides available to combat Septoria Leaf Spot, however, some growers prefer a more biological approach since Cannabis is a consumable product. Before purchasing any chemical treatment, be sure to check the pesticide laws in your jurisdiction, and always follow the product instructions provided by the manufacturer.


So now you know a bit about Septoria and what you can do to prevent it from ruining your grow. Have additional questions about Septoria Leaf Spot? You should join our forum where you can post pics and ask our expert community about this topic or any other!

Happy Growing!


Enjoyed the article? Want to continue the conversation?
Join Now

Do you want to receive the next Grower's Spotlight as soon as it's available? Sign up below!


Do you have any questions or comments?

Feel free to post below!


About the Author

Chris DeWildt is a graduate of Grand Valley State University and Western Kentucky University. He worked in education and publishing for ten years before joining the team at Growers Network.

Vera Cultivation Redefines the Cannabis Production Model with Ultra-Efficient Hybrid Facility

Do you want to be part of our private, professional community?
Join Now

Vera Cultivation announces a redefining of the Cannabis production model.

vera logo

The following is an article produced by a contributing author. Growers Network does not endorse nor evaluate the claims of our contributors, nor do they influence our editorial process. We thank our contributors for their time and effort so we can continue our exclusive Growers Spotlight service.


A unique blend of technologies allows Vera Cultivation to grow cannabis under the sun while maintaining an indoor environment.


(Boulder, CO) - PRESS RELEASE - Vera Cultivation, a Boulder-based cannabis company, launches a new model for sustainable cannabis production this summer. Vera has combined the advantages of greenhouse and indoor production to create a new cultivation model — dispelling the notion that greenhouse cannabis is inferior to indoor-grown product quality.

To ensure quality of product and maintain efficiency, the greenhouse is fully sealed--a radical departure from traditional greenhouse design. Vera utilizes chilled water to cool the environment and hydroponic cultivation systems. Automated cooling, dehumidification, and re-humidification systems combine to create a precisely controlled environment day or night throughout the year. “We identified weaknesses within the standard cultivation models that dominate our industry,” said Vera Cultivation CEO, Alex Park. “Indoor facilities create the best product but with unsustainable energy demands. Outdoor production and traditional greenhouses can be efficient, but the quality of product is unreliable."

Resource efficiency was a critical consideration incorporated into the facility design. Spent irrigation water is recaptured to limit water consumption. In order to maximize usable sunlight and minimize energy consumption from conventional grow lights, Vera chose a greenhouse glazing material which enables full spectrum light to reach the plants and stimulate cannabinoid production. "Our model--a fusion of both greenhouse and indoor benefits--will bridge the gap between greenhouse efficiency and indoor quality. We will demonstrate that the production of high-quality cannabis does not have to come with a price tag on the environment,” says Park.

Vera is a Boulder-based cannabis cultivation company with a mission to meet the rigorous wholesale product demands of the retail and extraction markets. In an evolving and fiercely competitive landscape, where sourcing clean, high-end material is essential to maintaining brand identity, Vera is the preferred cultivation solution for the cannabis industry.


Resources:

Want to get in touch with Vera Cultivation? They can be reached via the following methods:

  1. Website: www.veracultivation.com
  2. Email: contact@veracultivation.com
  3. Vera Cultivation Instagram
  4. Vera Cultivation on Facebook


Enjoyed the article? Want to continue the conversation?
Join Now

Do you want to receive the next Grower's Spotlight as soon as it's available? Sign up below!


Do you have any questions or comments?

Feel free to post below!


Growers Network’s Disease Profile: Bud Rot

Do you want to be part of our private, professional community?
Join Now

In this series of articles, Growers Network talks about a few of the most common Cannabis diseases you need to watch out for. Today’s topic: Bud Rot.

GN logo

Plant diseases are a major headache in any grow operation and Cannabis has no shortage of diseases. So for today’s disease profile we’re going to discuss Bud Rot, a disease you may find yourself dealing with in your grow.


Quick Look

  1. Common Name: Bud Rot or Gray Mold
  2. Scientific Name: Botrytis cinerea
  3. Symptoms: Fuzzy gray mold
  4. Caused by: Fungus
  5. Timing: Year round


Bud Rot


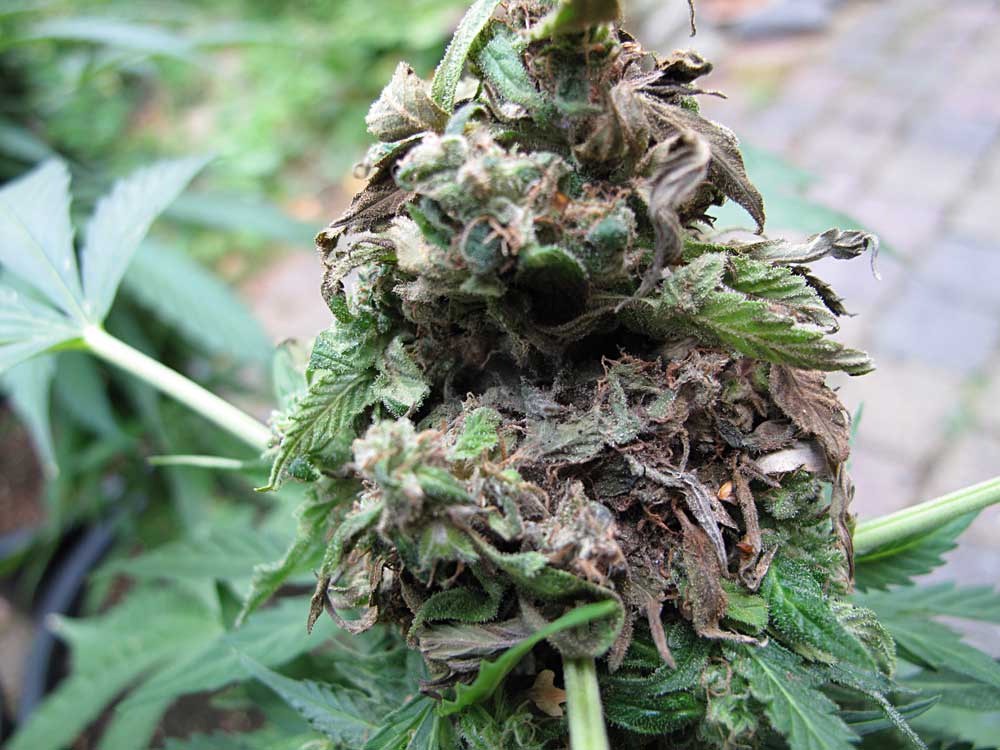
BR
This is bud rot. Don’t smoke it.

Writer’s Note: Bud rot should never be smoked or otherwise ingested. It is never safe, and doing so can cause serious complications for patients with lung ailments and/or compromised immune systems.

What is “bud rot”?

Bud Rot is a fungal infection that affects the buds of cannabis plants. It starts growing on the stem inside the bud and spreads outward (much like apple rot), and as a result it can be very hard to detect. As bud rot grows, it destroys the surrounding bud from the inside out, eventually producing spores to transmit to nearby buds, and turning what remains into a slimy mush in the process. Like other fungi, bud rot thrives in high humidity environments. However, unlike other fungal ailments, bud rot likes relatively cool temperatures.

What to look for

Bud rot appears as a fuzzy brown-gray mold on stems and buds. An often overlooked symptom is the growth of black seed-like structures that grow from the infected buds. These are best observed with a handheld microscope or jeweler’s loupe.

How to Treat/Prevent Bud Rot

There are no approved fungicides available for dealing with bud rot, so prevention is important. The best way to prevent it from starting is to control the humidity and temperature of your grow. Air flow is also important to keep bud rot from settling in. If you discover bud rot in your grow operation, you should remove the affected bud(s), being careful not to let the affected buds come into contact with other buds. You may have to remove an entire plant if the bud rot is widespread. Do not shake or otherwise cause the infected portions to vibrate -- doing so may release spores.

Editor’s Note: Bud rot can also be carried by insect pests! All normal prevention methods for insect pests can help as well.


So now you know a bit about bud rot and what you can do to prevent it from ruining your grow. Have additional questions about bud rot? You should join our forum where you can post pics and ask our expert community about this topic or any other!

Happy Growing!


Enjoyed the article? Want to continue the conversation?
Join Now

Do you want to receive the next Grower's Spotlight as soon as it's available? Sign up below!


Do you have any questions or comments?

Feel free to post below!


About the Author

Chris DeWildt is a graduate of Grand Valley State University and Western Kentucky University. He worked in education and publishing for ten years before joining the team at Growers Network.