We continue our trek through the basics of growing cannabis with a foray into the vegetative state.
The following is an article produced by a contributing author. Growers Network does not endorse nor evaluate the claims of our contributors, nor do they influence our editorial process. We thank our contributors for their time and effort so we can continue our exclusive Growers Spotlight service.
Vegetative Basics
Today we’re talking about vegging. No, not that thing you do when you toke too much. We’re talking about vegging your plants.
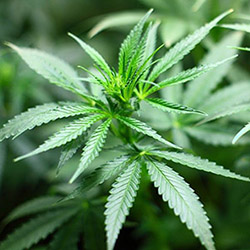
So what is veg? Veg, vegging, vegetative, etc. are all terms used to describe the period between when a Cannabis plant is between a seedling/clone and flowering. Vegetative is when your marijuana is just taking in nutrients, water, and light to get bigger. It’s not flowering, it’s maturing, like a child turning into a teenager.

So what do you need to know about vegetative state? What do you need to do?

Watering
If this is your first time growing any plant, we need to cover a few basics about soil and watering regimens. First and foremost, we need to know how our plants are feeling. Plants express how they’re feeling very differently than animals do, but they express their feelings nonetheless.
For example, if you’re underwatering, your plants will start to droop and go limp, as water makes up a large portion of a plant’s structure. If you’re overwatering your plants, they may start to show signs of death as the roots drown.
To avoid harming your plants with water, here’s a few tricks:
- Use a saucer underneath your pots. The saucer holds excess water, preventing it from running off with precious nutrients, and the plant’s roots will gradually draw this water up from the saucer. A saucer will tell you when you’re underwatering or overwatering as well. If it’s empty, then your plant needs more water. If it’s full, stop watering.
- Don’t just get the top of the soil wet. Let it pool a little bit when you water it. Water needs to sink down into the soil. You can use a thin stick (or your finger) to poke down into the soil -- if the soil sticks all the way down your little stick (or your finger), good job, it’s just right. If it only sticks partially… then the soil needs more water. If you pull up mud, stop watering immediately.
- Try to pour the water on the soil, not the leaves. Wet leaves encourage the formation of mold and fungus, so apply water directly to the soil.
- If you’re growing inside, figure out a regular watering schedule. Once a day, once every other day, once every three days… all can work depending on how much you’re watering.
- If you’re growing outside, you’ll have to keep a closer eye on how your plants are behaving. Humidity and rain can greatly affect how thirsty your plant is, and you’ll need to adjust your watering schedule accordingly.
 |
 |
 |
Nutrients
If you bought fresh bags of potting soil to grow in (as we recommended), generally you won’t need to supplement your nutrients. If you’re reusing soil or using soil from elsewhere, you may need to add nitrogen into the soil during vegetative stage. Phosphorus and potassium are less important here.
There’s a variety of sources for nitrogen out there, and most can be bought online or at a gardening store. If you want to grow organically, look for source materials that are organic or biological in origin.
Lighting
During veg, plants should be getting 18 hours of light. If you’re growing outdoors, this will depend on your latitude and the weather, so check the Weather Channel to find out what it’ll be like in your area.
If you’re growing indoors though, this means you’ll be running your lights on an 18 hours on, 6 hours off schedule (referred to as 18-6). Some LED systems can be programmed to run on a schedule, and other lights you can handle manually or with timers.
If you have a choice in the lighting color, tend towards white-bluish light in vegetative. In a more advanced How to Grow article, we’ll cover what this means in terms of color temperature and light output, but for now, just know that your plant prefers bluish-white light during vegetative state (greater than 4000K), and reddish yellow during flowering (less than 4000K).

Temperature and Humidity
Now that we’re in vegetative state, we’re no longer growing in a dome. This means we have to worry a bit more about the environment our plant is in. If you’re growing outdoors, you have very little control over temperature and humidity, so you’ll need to start growing after the danger of frost has passed. Check the Weather Channel to know when that is for your locale.
If you’re growing indoors, we’ll ideally be aiming for temperatures that are around 75-85 degrees Fahrenheit, or 24 to 29 degrees Celsius. If you don’t want to run your air conditioning that warm, that’s fine. It just means your plants may grow a little slower, but it should be alright.
The only things we suggest staying away from are swamp coolers. If your air conditioning for your residence uses a swamp cooler, keep your plants far away from it, or get a new air conditioning unit. Swamp coolers greatly humidify surrounding air, which can cause fungal issues in your plants.
Training
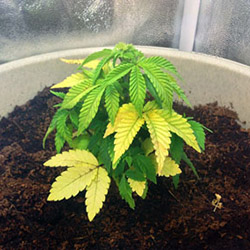
During the vegetative phase, you may need to do some light trimming around the plant. If you find any leaves that are constantly in shade or are yellow, give them a clip with some scissors or a sharp knife. Don’t go overboard! The plant needs a lot of its leaves in this stage, so only trim leaves that are towards the bottom of the plant.
If you want to make sure your plants don't fall over, make sure to get some wood or bamboo stakes into the ground and tie them to your plants with vine clips.
Editor's Note: Alternatively, consider learning how to SCROG in one of our more advanced lessons coming soon!
And that’s about it for veg. Do you have any questions? Let us hear them in the comments section below, or on the Growers Network forum!
10 Best Gift Ideas for Cannabis Connoisseurs and Growing Aficionados (2022)
December 7, 2022Developing and Optimizing a Cannabis Cultivation System
December 14, 2021Dealing with Insomnia: How Can CBD Help?
December 10, 2020Your Guide to Sleep and CBD
December 7, 2020
Do you want to receive the next Grower's Spotlight as soon as it's available? Sign up below!

Do you have any questions or comments?

About the Author
Hunter Wilson is a community builder with Growers Network. He graduated from the University of Arizona in 2011 with a Masters in Teaching and in 2007 with a Bachelors in Biology.