In the second part of this two-part how-to article, Growers Network discusses what to expect during weeks 3-8 of the Cannabis flowering cycle.
The following is an article produced by Growers Network. This article is for educational purposes only. We do not claim any responsibility for any legal or financial repercussions of your decisions. Always consult with a lawyer or attorney before making a decision that could have a legal consequence!
Flowering Basics Weeks 3-8
Flowering Basics Weeks 3-8
Welcome back beginning grower. This is the 2nd part of our two-part series on Cannabis flowering for beginners. If you haven’t already, make sure to check out Part 1 here!

Okay, let’s continue our cannabis flowering journey as we go from week three through week 8.
Weeks 3-4: Buds Form
The stretch of your Cannabis plants will slow as we reach week four, but expect the upward growth to continue. At this stage you’ll finally be able to see the buds as they continue to develop. The pistils will still be white at this stage and sticking straight out from the buds.
This part of cannabis flowering is when your plants are going to be exceptionally responsive to changes in their environment and nutrients, so make sure that you’re monitoring your plants closely. Remember, you may be in the home stretch, but you’ve got about another month to go, and you don’t want any health issues to start now. Your plants were pretty resilient in the vegetative stage, but now they are much more sensitive.
Things to watch for at this stage are:
- Leaf symptoms such as yellowing or discoloration. Don’t be alarmed if you see a few leaves die and fall off, especially if these leaves aren’t getting any light. Overall, your plants should still be lush and green in weeks 3-4.
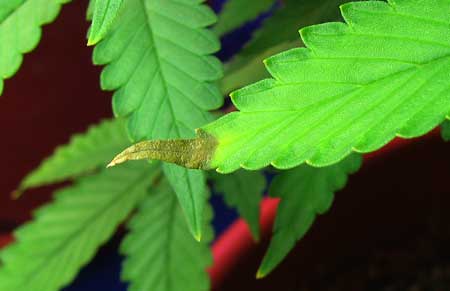
- Nutrient burn. This happens when your plants are given too high levels of nutrients, and the tips of the leaves begin to look “burned.” A bit of nutrient burn won’t hurt your plants, but if the nutrient input isn’t reduced, the burn will continue to climb the plant. Plants that have experienced a severe nutrient burn can still produce healthy buds, so nutrient burn isn’t a reason to give up on a plant.
- If nutrient burn gets bad enough, it will reach your sugar leaves, which means you won’t be able to trim them after harvest and your buds will appear to have brown spots where the leaves were burned. Be sure to check out our how-to article on trimming if you don’t already know the value of sugar leaves.
- Nutrient Deficiencies. Nutrient deficiencies can result if similar problems to nutrient burn if not remedied. It won't necessarily affect the potency of your flowers, but they’ll look worse than they could have if you were providing proper nutrients and care.
- Light Burn. If your plants are getting too close to your lights as they grow, they may start to discolor, or “photobleach.” If you start to notice this, either increase the height you have the lights at, find a way to lower your plants, or start bending them away from the light.
In short, to grow nice buds, you will want to avoid nutrient burn and deficiencies as much as you can. Your plants aren’t growing leaves like they were in the vegetative state, so it’s very important to take care of the leaves you have!
The last thing to note at this stage is that your plants have probably started to smell. Depending on your situation this may be a good or bad thing, but if you’d rather not explain the smell to anyone downwind, you should consider a carbon filter to solve your smell problem.
Need Cannabis Seeds? Find resources here!
Weeks 4-6: Buds Fatten Up
At this stage of cannabis flowering, your buds are getting bigger. They’ll still have all the white pistils sticking out, but you’ll be able to see the buds getting bigger every day.
At this point the “stretch” is about over and you can reduce the amount of training you’re doing with your plants. You’ll also want to make sure your buds and colas are standing up straight. Provide support with netting or ties, and don’t flatten them down.
Since your plants aren’t adding a lot of new leaves at this stage, you have to be careful with the ones you still have. You may want to trim away leaves that are covering up your bud sites, and this is acceptable, but remember that plenty of good leaves serve as nutrient storage for the plant!
The pistils will probably still be white at this stage, but watch those buds grow!
Weeks 6-8: Pistils Darken and Buds Ripen
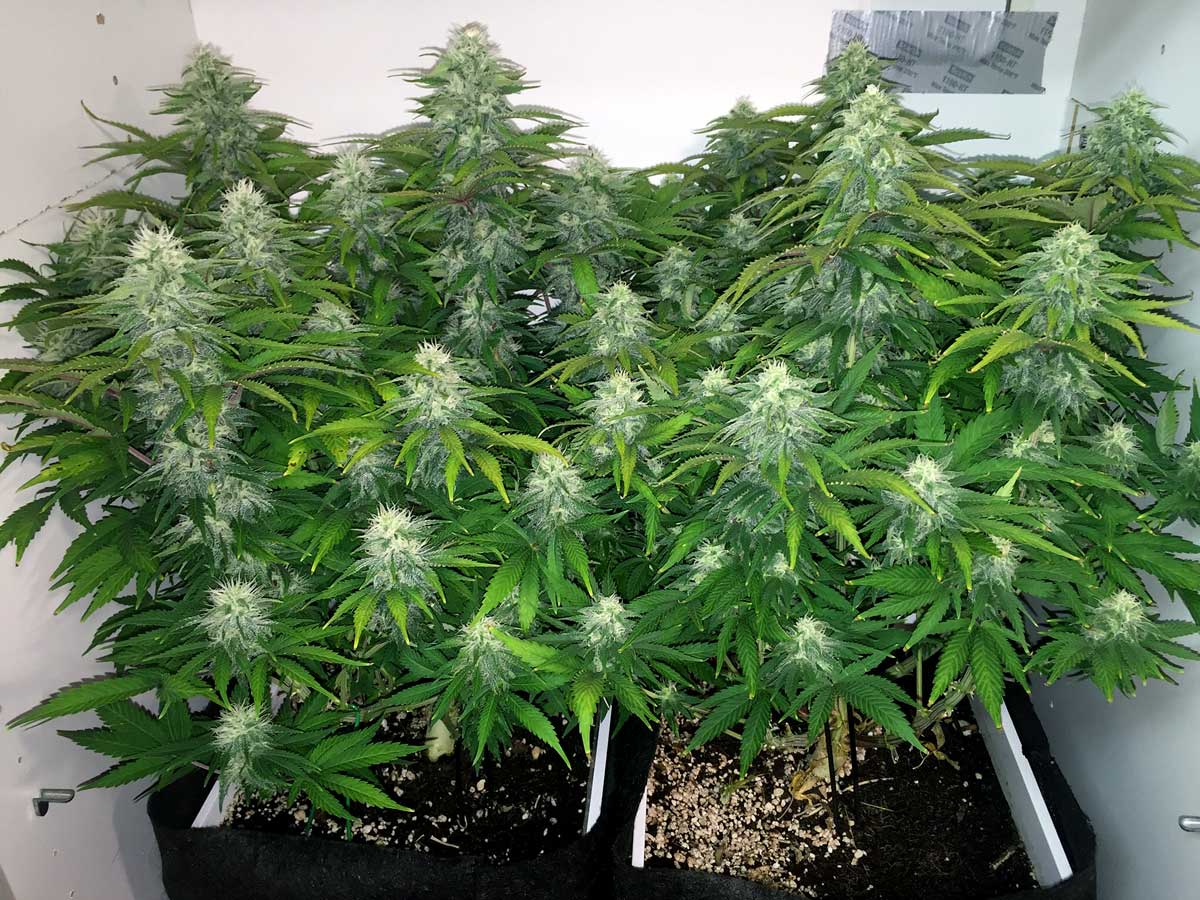
At this stage of cannabis flowering, your plants are done generating new leaves altogether and putting the last of their resources into growing buds.
Cannabis is an annual plant, meaning that once it reproduces, it dies. So, it’s natural to see a few of the leaves begin to die as the plants puts all their remaining energy into securing the next generation (Well, it would if we had allowed them to pollinate).
The plants should still be mostly green even this late in flowering. Don’t let your guard down if you see yellow leaves, because it could be nutrient or light burn, both common during the flowering stage, and a quick response is critical. We’ll cover these more thoroughly in another article but for now, check out the images below.
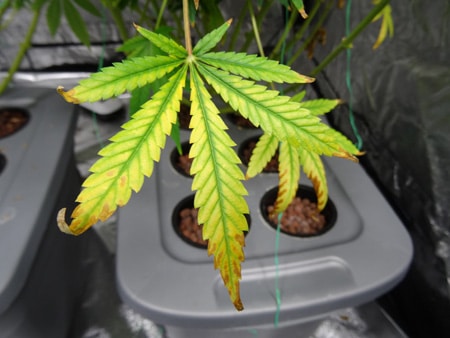
You can generally avoid these late cannabis flowering problems by making sure you plants aren’t getting too much heat or light. You don’t want to discolor, bleach, or burn your buds. Too much heat can also evaporate away some of your THC and that means lower potency!
Week 8+: End of Flowering, Flush, and Harvest
Okay new grower, you’re almost there. Are you treating your plants like the divas they are? Attending to their every need? You better be, this close to the end you don’t want any problems that will interfere with your upcoming harvest. Though there are exceptions, few strains will be ready for harvest at week 8, but we can see the finish line just ahead.
Many growers will do a final flush around this time. This simply means they stop treating with nutrients and give water only for a few days up to a few weeks before harvest. This allows any remaining nutrient chemicals to be “flushed” out of the plants. If you’re growing in soil like we recommended, cease any fertilizer use. In hydro grows, they literally flush out all the remaining nutrients.
You should see trichomes and pistils maturing at this stage of flowering, with the pistils darkening and the trichomes becoming opaque or cloudy (for more about this be sure to check out our When to Harvest article). At this stage you’re really just maintaining your plants until the buds are ready. Since different strains will be ready at different times, there is no magic formula to calculate how many days or weeks until your harvest, so keep an eye on those pistils and trichomes!
When you’re this close to harvest, leaf yellowing is normal, as your plant is putting its last bit of energy into growing the buds. Just be sure that your buds still look nice and healthy. If you haven’t installed a filter by this point you may want to consider it if your plants are “stinky.” Remember to respect your neighbors!
One final tip here -- if your buds look like they’re being damaged by light, heat, or nutrient issues, it’s better to harvest a bit early than to let the quality degrade further. Chalk it up as a learning experience. They’re not mistakes, they’re opportunities to improve your knowledge and technique.

So there you have it. If your buds look go you’re ready to harvest, trim, dry, and cure. Great job new grower! You raised her up from a seed and now it’s time to see just what she can do.
10 Best Gift Ideas for Cannabis Connoisseurs and Growing Aficionados (2022)
December 7, 2022Developing and Optimizing a Cannabis Cultivation System
December 14, 2021Dealing with Insomnia: How Can CBD Help?
December 10, 2020Your Guide to Sleep and CBD
December 7, 2020
Do you want to receive the next Grower's Spotlight as soon as it's available? Sign up below!

Do you have any questions or comments?

About the Author
Chris DeWildt is a graduate of Grand Valley State University and Western Kentucky University. He worked in education and publishing for 10 years before joining the team at Growers Network.